


What if the ice cube you just grabbed to soothe your throbbing finger is actually making the tissue damage worse? When a kitchen mishap or a hot surface leaves you with a sharp, pulsing pain, your first instinct is often to reach for whatever is in the fridge. Knowing the correct first aid for finger burns is the difference between a quick recovery and a painful, lasting scar. We understand the distress of a sudden injury in such a sensitive area, and you need a professional solution that transitions you from pain to comfort immediately.
Immediate pain relief and rapid cooling. This guide provides the exact steps to stop the heat, prevent blisters, and treat the site safely using expert techniques. We'll show you how to neutralize the burn and shield the skin from external stressors using moisture-retaining technology. You'll learn how to achieve fast healing and prevent infection without needing a restrictive bandage that limits your daily movement. From the initial cooling phase to the science of long-term skin recovery, we provide the specialist knowledge you need to handle this minor crisis with confidence.
Key Takeaways
- Stop the heat source immediately and remove any rings or jewelry before swelling makes it difficult to clear the affected area.
- Identify the difference between simple redness and painful blistering to ensure you apply the correct first aid for finger burns based on the injury's depth.
- Avoid dangerous home remedies like butter, grease, or ice that trap heat and can lead to further tissue damage or infection.
- Use professional-grade hydrogel dressings to extract heat continuously while maintaining the moisture balance necessary for fast, effective healing.
- Keep a specialized burn kit in your kitchen so you're prepared with non-stick materials that won't tear sensitive skin during the recovery process.
Immediate Response: What to Do for a Finger Burn
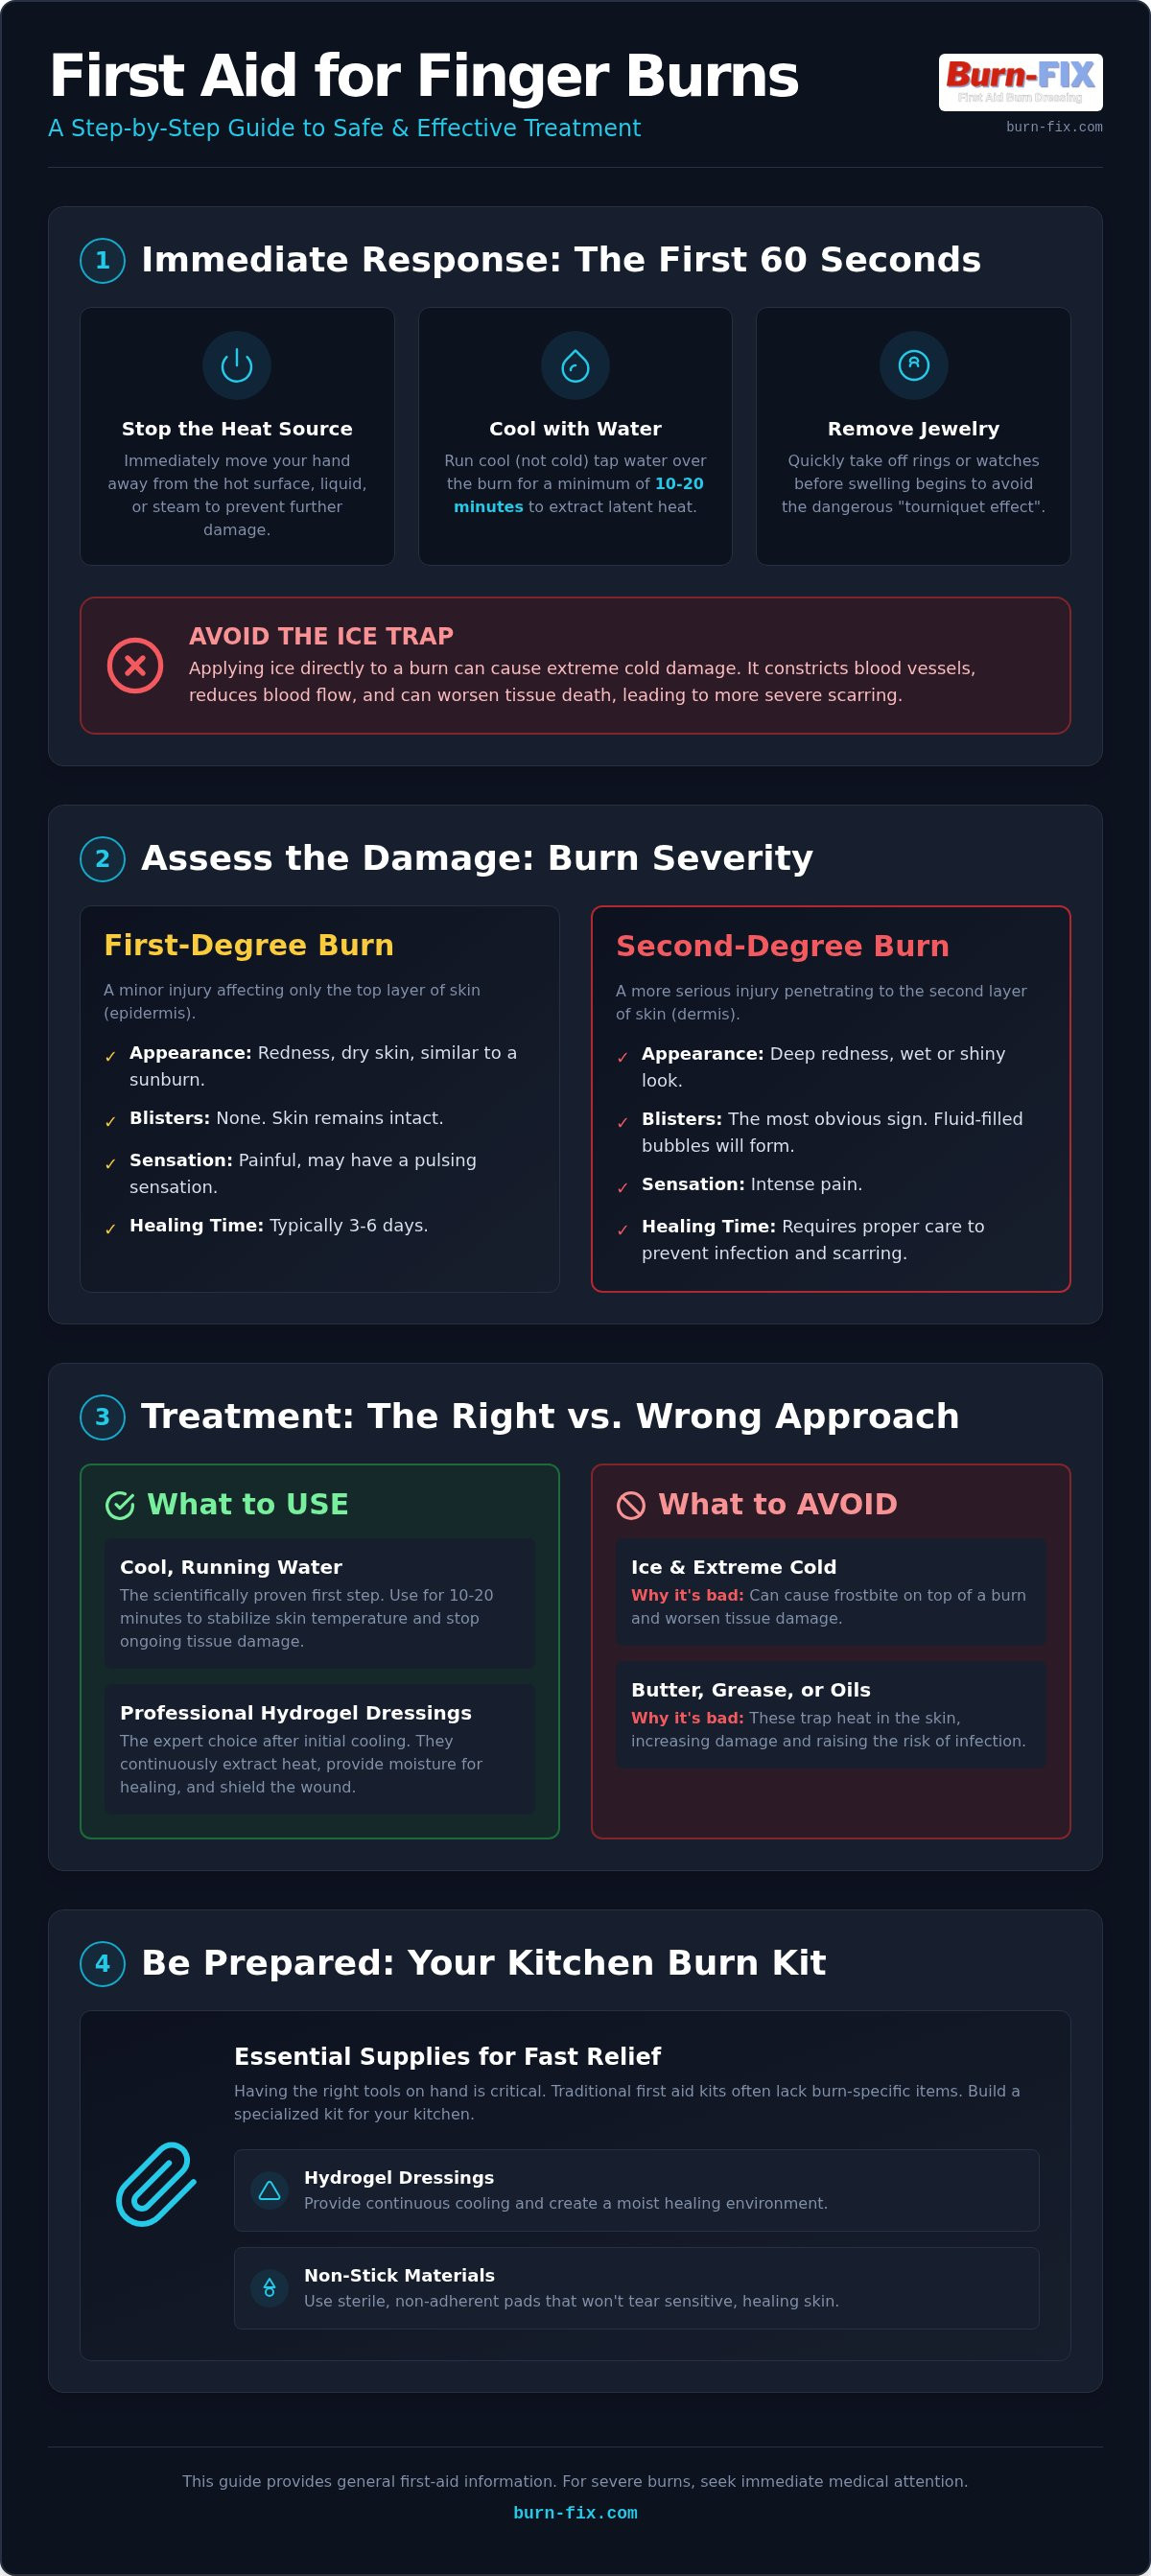
The first few seconds after a thermal injury are the most critical. You need to act with speed to stop the skin from continuing to cook. Immediately move your hand away from the stove, steam, or hot liquid. Effective first aid for finger burns begins with neutralizing the heat before it penetrates deeper into the sensitive tissue of your digits. Follow these immediate steps to stabilize the injury:
- Stop the burn: Remove the heat source or move to a safe area immediately.
- Cool the skin: Use cool, running tap water for a minimum of 10 to 20 minutes.
- Clear the area: Take off rings, watches, or restrictive clothing from the hand before swelling peaks.
Don't reach for the freezer. While it's tempting to grab an ice cube for instant relief, this is what specialists call the "Ice Trap." Extreme cold causes your blood vessels to constrict sharply. This reduces blood flow to the already damaged area, which can actually worsen the tissue death and increase the risk of long-term scarring. Stick to cool, flowing water to stabilize the temperature safely without shocking the system.
The Critical Rule of Jewelry Removal
Fingers are unique because they have very little room to accommodate swelling. When you experience a burn, your body sends fluid to the site as part of its natural inflammatory response. If you're wearing a ring, that band of metal won't expand with your skin. This creates a "tourniquet effect" that can cut off circulation to the tip of your finger within minutes, potentially leading to severe complications.
Remove all rings, watches, or bracelets immediately. If a ring is already feeling tight, use a bit of soap or a specialized lubricant to slide it off before the swelling becomes too severe. If the metal is already stuck, you may need professional medical assistance to have it cut off safely. Protecting your blood flow is just as important as treating the burn itself.
Cooling Techniques: Water vs. Initial First Aid
Once the jewelry is clear, place your finger under cool, running tap water. You should maintain this for at least 10 to 20 minutes. This duration isn't a suggestion; it's a clinical standard. It takes time to pull the latent heat out of the deeper dermal layers. If you stop too soon, the heat remains trapped and continues to damage the skin even after the surface feels cooler.
While water is an excellent starting point, it isn't a long-term solution for pain management or infection prevention. This initial cooling phase is about stabilization. After 20 minutes, you'll want to transition to a sterile cooling agent that provides continuous relief and moisture. Having a clear grasp of understanding burn classifications helps you determine if your cooling efforts are sufficient or if the injury requires more advanced intervention. Proper first aid for finger burns ensures that you stop the damage at the surface before it can affect the nerves or the delicate fingernail bed.
Assessing the Damage: Is Your Finger Burn First or Second Degree?
Identifying the depth of your injury is the next step in delivering effective first aid for finger burns. While the initial pain is always sharp, the physical characteristics of the wound will tell you if you're dealing with a surface-level irritation or a deeper tissue injury. You need to distinguish between a first-degree burn and a second-degree burn to choose the correct recovery path and avoid unnecessary complications.
Symptoms of a Minor Finger Burn
A first-degree finger burn is a minor injury affecting only the epidermis. You'll notice a red, dry appearance similar to a sunburn, but the skin will remain intact without any lifting or bubbling. Because your fingertips are packed with sensory receptors, you might experience a rhythmic, pulsing sensation; this happens when the high concentration of nerve endings becomes overstimulated by the heat. These minor surface burns typically heal within three to six days without leaving a permanent mark on your skin.
Identifying Second-Degree Burns
Second-degree burns are more serious because they penetrate into the dermis, which is the second layer of skin. The most obvious sign is the formation of blisters. These fluid-filled bubbles are your body's way of protecting the raw tissue underneath, and they often appear alongside deep redness and a "wet" or shiny appearance. You'll likely experience much more intense pain than a surface burn. If you see blistering, it's a clear signal that the injury requires more than just a quick rinse. Following proper burn care protocols at this stage is vital to prevent the blisters from popping prematurely and inviting infection into the open wound.
When to Seek Professional Medical Care
Some finger burns require an immediate trip to the emergency room or urgent care. Use the "Hand Rule" as a general guide; if the burned area is larger than the palm of the person who was injured, it's considered a major injury. You should also seek professional help if the burn wraps entirely around the finger or involves a joint, as the resulting swelling can restrict movement or blood flow. Burns affecting the fingernail bed or those caused by chemicals and electricity are always high-risk and require a specialist's eye. Infants and the elderly have thinner, more delicate skin, so even a small burn can be deep and dangerous for them. Keeping a BurnFix Burn Kit on hand ensures you have the tools to stabilize these injuries while waiting for medical help. Proper first aid for finger burns means knowing when the situation is a minor home fix and when it's a medical priority.
Hydrogel vs. Home Remedies: The Science of Superior Cooling
While running water is the standard first step, standing at a sink for 20 minutes is often impractical and difficult to maintain. This is where modern first aid for finger burns evolves from basic cooling to professional recovery. Many people reach for kitchen staples in a moment of panic, but these "remedies" often do more harm than good. Butter, oils, and heavy ointments create an insulating seal over the injury. This traps the heat inside the skin, effectively increasing the "cook time" and allowing the burn to penetrate deeper into your tissue.
Why Hydrogel is the Professional Choice
Hydrogel works through a process of continuous heat extraction. It draws the thermal energy out of the dermis and dissipates it, providing a cooling effect that lasts much longer than water alone. By maintaining a moisture-rich environment, it prevents the formation of hard, restrictive scabs that can crack and delay healing. Hydrogel provides a sterile barrier while cooling the site, ensuring the sensitive area remains protected from bacteria and external irritants.
For those hard-to-reach areas between digits or when the skin is too painful to touch, BurnFix Hydrogel Burn Spray offers immediate relief. It neutralizes the pain on contact without the need for physical pressure, which is vital for preserving the integrity of the skin. Recovery times also improve significantly with this method. Research in advanced wound care suggests that hydrogel-treated burns can heal up to 50% faster than those left to "air dry," as dry healing leads to cell dehydration and increased inflammation.
Common Myths to Avoid in Your Kitchen
You might have heard that toothpaste or flour can "draw out" the heat. In reality, these substances are not sterile and can lead to severe infections or irritate the wound with abrasive chemicals and scents. There's a major difference between temporarily numbing a sensation and actually treating the underlying damage. Following Mayo Clinic's burn first aid guide, the priority is always cooling and protecting, not applying unverified pantry items that complicate the cleaning process later.
Don't reach for Neosporin or heavy antibiotic ointments immediately either. While they have their place in later stages of wound care, their thick, petroleum-based formulas can trap heat just like butter does. If you apply a heavy grease to a fresh burn, you're essentially sealing the heat in. Stick to specialized cooling agents that are designed to breathe while they soothe, ensuring the recovery process starts the moment the accident happens.
How to Dress a Finger Burn to Protect the Blister
Dressing a digit requires a balance between protection and mobility. Standard adhesive bandages are often too aggressive for burnt skin. When you apply a traditional adhesive, the glue can bond to the fragile epidermis, meaning you risk tearing away the very tissue your body is trying to knit back together. Effective first aid for finger burns relies on non-stick materials that preserve the skin's integrity while maintaining a moist healing environment. This approach prevents the wound from drying out and simplifies the dressing change process.
The "Blister Rule" is absolute: never pop it. That fluid-filled bubble is your body's sterile, internal bandage. It shields the raw dermis from bacteria and provides a cushioned space for new skin cells to grow. If you puncture it, you expose the wound to the air and significantly increase the risk of infection. Your goal is to shield this area with a professional barrier, such as a Burn-FIX 4x4 First Aid Burn Gel Dressing, which provides instant cooling without adhering to the injury site.
Applying the Dressing Correctly
Positioning is key when treating a fingertip or a joint. Start by centering the gel pad over the burn. If the injury is on the tip, fold the dressing over the top of the finger to provide full coverage. Secure the gel pad using paper tape or a loose roll of sterile gauze. You must wrap the finger loosely to allow for the natural swelling that follows a thermal injury. If the wrap is too tight, you risk the tourniquet effect mentioned earlier. For those dealing with scalds from a kettle or stovetop, our guide on First Aid for Steam Burns offers additional techniques for handling high-moisture injuries.
Maintaining Hygiene and Mobility
Fast healing depends on a clean environment. You should change your hydrogel dressing typically every 24 hours to ensure the site remains sterile and properly hydrated. Between changes, clean the finger gently with mild soap and cool water. Don't scrub the area; instead, let the water flow over it and pat the surrounding healthy skin dry with a clean towel. Keeping the dressing dry during daily activities is essential for preventing bacterial growth. You can use a loose-fitting finger cot or a plastic covering when washing dishes or showering, but remove it immediately afterward to let the skin breathe. Consistent care ensures the recovery stays on track without the need for restrictive, bulky bandages. To ensure you have these professional tools ready for any kitchen mishap, secure a Burn-FIX 4x4 First Aid Burn Gel Dressing for your home safety kit today.
Preventing Finger Burns: Building a Better First Aid Kit
Prevention is the most effective form of protection, yet even the most cautious home chef can experience a sudden slip of the hand. While the previous sections focused on the immediate first aid for finger burns, long term safety relies on having a professional response ready before the injury occurs. Most standard first aid kits are ill-equipped for thermal injuries, often containing only basic bandages and antiseptic wipes that do nothing to stop the progression of a burn. This lack of preparation leads to panic, which often results in the use of dangerous home remedies that complicate the healing process.
A dedicated Emergency Burn Kit is a non-negotiable requirement for any modern household. By centralizing your supplies, you eliminate the frantic search through cabinets while in pain, allowing you to transition from injury to relief in seconds. The presence of Burn-Fix products in your drawer acts as a psychological safety net, reducing the spike of adrenaline and fear that usually accompanies a burn. Professional-grade tools like those found in a specialized Kitchen Safety First Aid Kit ensure that you aren't forced to rely on ineffective pantry items during a crisis.
The Home Chef’s Burn Care Checklist
Efficiency matters when treating small, sensitive areas. For finger-sized injuries, individual hydrogel packets are significantly more practical than large, multi-use bottles. These packets provide the exact amount of gel needed to coat a digit without the risk of contaminating a larger container or wasting product. Your checklist should also include sterile gauze and high-quality paper tape, which allow you to secure a dressing without sticking to the wound. Having these items pre-staged means you can apply a professional barrier the moment the heat is neutralized. Store your burn supplies in a cool, dry place away from direct sunlight to maintain the shelf life and cooling efficacy of the hydrogel. Check your expiration dates annually to ensure your first aid for finger burns remains reliable when you need it most.
Habits for a Burn-Free Kitchen
Safety is a collection of small, consistent habits that protect your household. Implement the "back burner rule" by always turning pot handles toward the center of the stove to prevent them from being bumped or grabbed. Be especially mindful of steam vents on microwave containers and pressure cookers; these can cause deep scalds in a fraction of a second if you open them too quickly. Establish a clear "no-go zone" around the oven for pets and kids to reduce the risk of accidental contact with hot surfaces. By combining these proactive habits with professional-grade supplies, you create a safer environment where minor accidents remain minor, and recovery is always within reach. Preparation doesn't just treat the injury; it provides the peace of mind that you can handle any kitchen crisis with the calm authority of a specialist.
Take Control of Your Recovery
Successful first aid for finger burns depends on speed and the right tools. You've learned that cooling the skin for 20 minutes under water is just the beginning. By avoiding the "Ice Trap" and choosing hydrogel over kitchen grease, you neutralize the heat and protect the sensitive nerve endings in your fingertips. A blister is your body's natural defense; shielding it with a non-stick dressing ensures the recovery process remains uninterrupted and pain-free.
Preparation is what separates a minor kitchen mishap from a long-term injury. Our moisture-retaining hydrogel technology provides the instant cooling and pain relief you need during those first critical minutes. It's a trusted solution used by emergency responders and home chefs alike to manage thermal injuries with professional precision. Don't wait for an accident to happen before you search for a solution. Equip your kitchen with a professional Burn-FIX Emergency Kit today to ensure you're always ready to handle a burn with confidence.
You now have the knowledge and the specific steps required to heal quickly and safely. Stay prepared, act fast, and keep your kitchen a place of comfort and creativity.
Frequently Asked Questions
How long should I keep my burned finger under water?
You should keep your burned finger under cool, running tap water for at least 10 to 20 minutes. This duration is a clinical standard because it takes time to extract latent heat from the deeper dermal layers. If you stop too soon, the heat remains trapped and continues to damage the tissue even after the skin feels cooler. After this initial stabilization, transitioning to a sterile hydrogel dressing provides continuous relief and long-term moisture.
Should I put ice on a finger burn if it is throbbing?
You should never put ice directly on a finger burn. While the extreme cold might feel like instant relief for a throbbing sensation, it actually causes your blood vessels to constrict sharply. This reduces essential blood flow to the damaged area and can lead to further tissue death or frostbite on top of the thermal injury. Stick to cool water or professional hydrogel sprays to neutralize the heat safely without shocking your system.
Is it okay to pop a blister on my finger?
You must never pop a burn blister on your finger. That fluid-filled bubble acts as a sterile, natural bandage that protects the raw tissue underneath from bacteria. Puncturing the blister exposes the wound to the air and significantly increases your risk of infection. Instead, shield the area with a non-stick dressing that provides a cushioned environment, allowing the new skin to grow safely and naturally without external interference.
When should I see a doctor for a finger burn?
Seek medical attention if the burn is larger than your palm or if it wraps entirely around the finger. You should also see a doctor if the injury involves a joint, the fingernail bed, or shows signs of infection like increased swelling and pus. Because infants and the elderly have thinner skin, their burns are often deeper than they appear and require professional evaluation to ensure effective first aid for finger burns is administered.
Can I use butter or coconut oil on a fresh burn?
You should avoid using butter, coconut oil, or any heavy greases on a fresh burn. These substances create an insulating seal that traps heat against the skin, effectively increasing the "cook time" and allowing the damage to penetrate deeper into your tissue. These pantry items are also not sterile and can introduce bacteria into the wound. Professional hydrogel is a better alternative as it dissipates heat while maintaining the moisture balance needed for healing.
What is the best way to wrap a burned finger?
The best way to wrap a burned finger is with a loose, non-stick dressing that won't adhere to the fragile skin. Start by applying a sterile gel pad over the injury and secure it with paper tape or a light gauze roll. You must wrap the digit loosely to accommodate the natural swelling that follows a thermal injury. A tight wrap can cut off circulation, so ensure you maintain mobility and comfort during the dressing process.
How long does a second-degree finger burn take to heal?
A second-degree finger burn typically takes two to three weeks to heal, depending on the severity and how well you manage the wound. Using professional-grade first aid for finger burns, such as moisture-retaining hydrogel, can speed up this process by preventing cell dehydration and secondary damage. If the area is kept clean and protected from friction, you can expect the new skin to fully regenerate without significant scarring or long-term complications.
Will a burn on my fingertip affect my fingernail growth?
A burn on your fingertip will only affect fingernail growth if the heat reaches the nail matrix or the underlying nail bed. The matrix is the area where the nail starts to grow, located just under the cuticle. If this area is severely damaged, you may notice temporary ridges or permanent changes in the nail's shape. Immediate cooling and proper hydration of the surrounding tissue are essential to protect these delicate structures from lasting thermal damage.


