


You’re plating a masterpiece when your wrist brushes the scorching rim of a Dutch oven. The searing, localized heat is immediate. In that split second of throbbing pain, your first instinct might be to grab an ice cube or reach for the butter dish, but these common myths can actually trap heat and deepen the injury. Knowing the correct first aid for stove burns is the difference between a minor sting and a permanent scar. Every sixty seconds, someone in the United States suffers a burn serious enough to require treatment; most of those accidents happen right in the heart of the home.
We understand the urgency of a kitchen accident and the uncertainty of whether a trip to the emergency room is necessary. This guide provides professional medical standards to help you neutralize pain instantly and prevent the blisters that lead to scarring. You’ll learn how to distinguish between minor redness and serious tissue damage while discovering why hydrogel technology is the superior choice over traditional gauze. We’ll walk through a step by step protocol to cool the skin, retain essential moisture, and get you back to your culinary passion with confidence.
Key Takeaways
- Learn to identify the difference between a minor singe and a second-degree injury to determine if you need professional medical intervention or home care.
- Master the essential steps of first aid for stove burns, starting with immediate cooling under room-temperature water to halt tissue damage.
- Discover why kitchen staples like butter and ice are dangerous for fresh injuries and how they can actually trap heat or cause further necrosis.
- Understand the "Golden Rule" of blister care and how to apply specialized solutions like the Burn-FIX 4x4 First Aid Burn Gel Dressing for optimal healing.
- Build a dedicated "Burn Station" equipped with BurnFix Hydrogel Burn Spray to ensure you're prepared for the next accidental splash or touch.
Classifying Stove Burns: Is it a Minor Singe or a Medical Emergency?
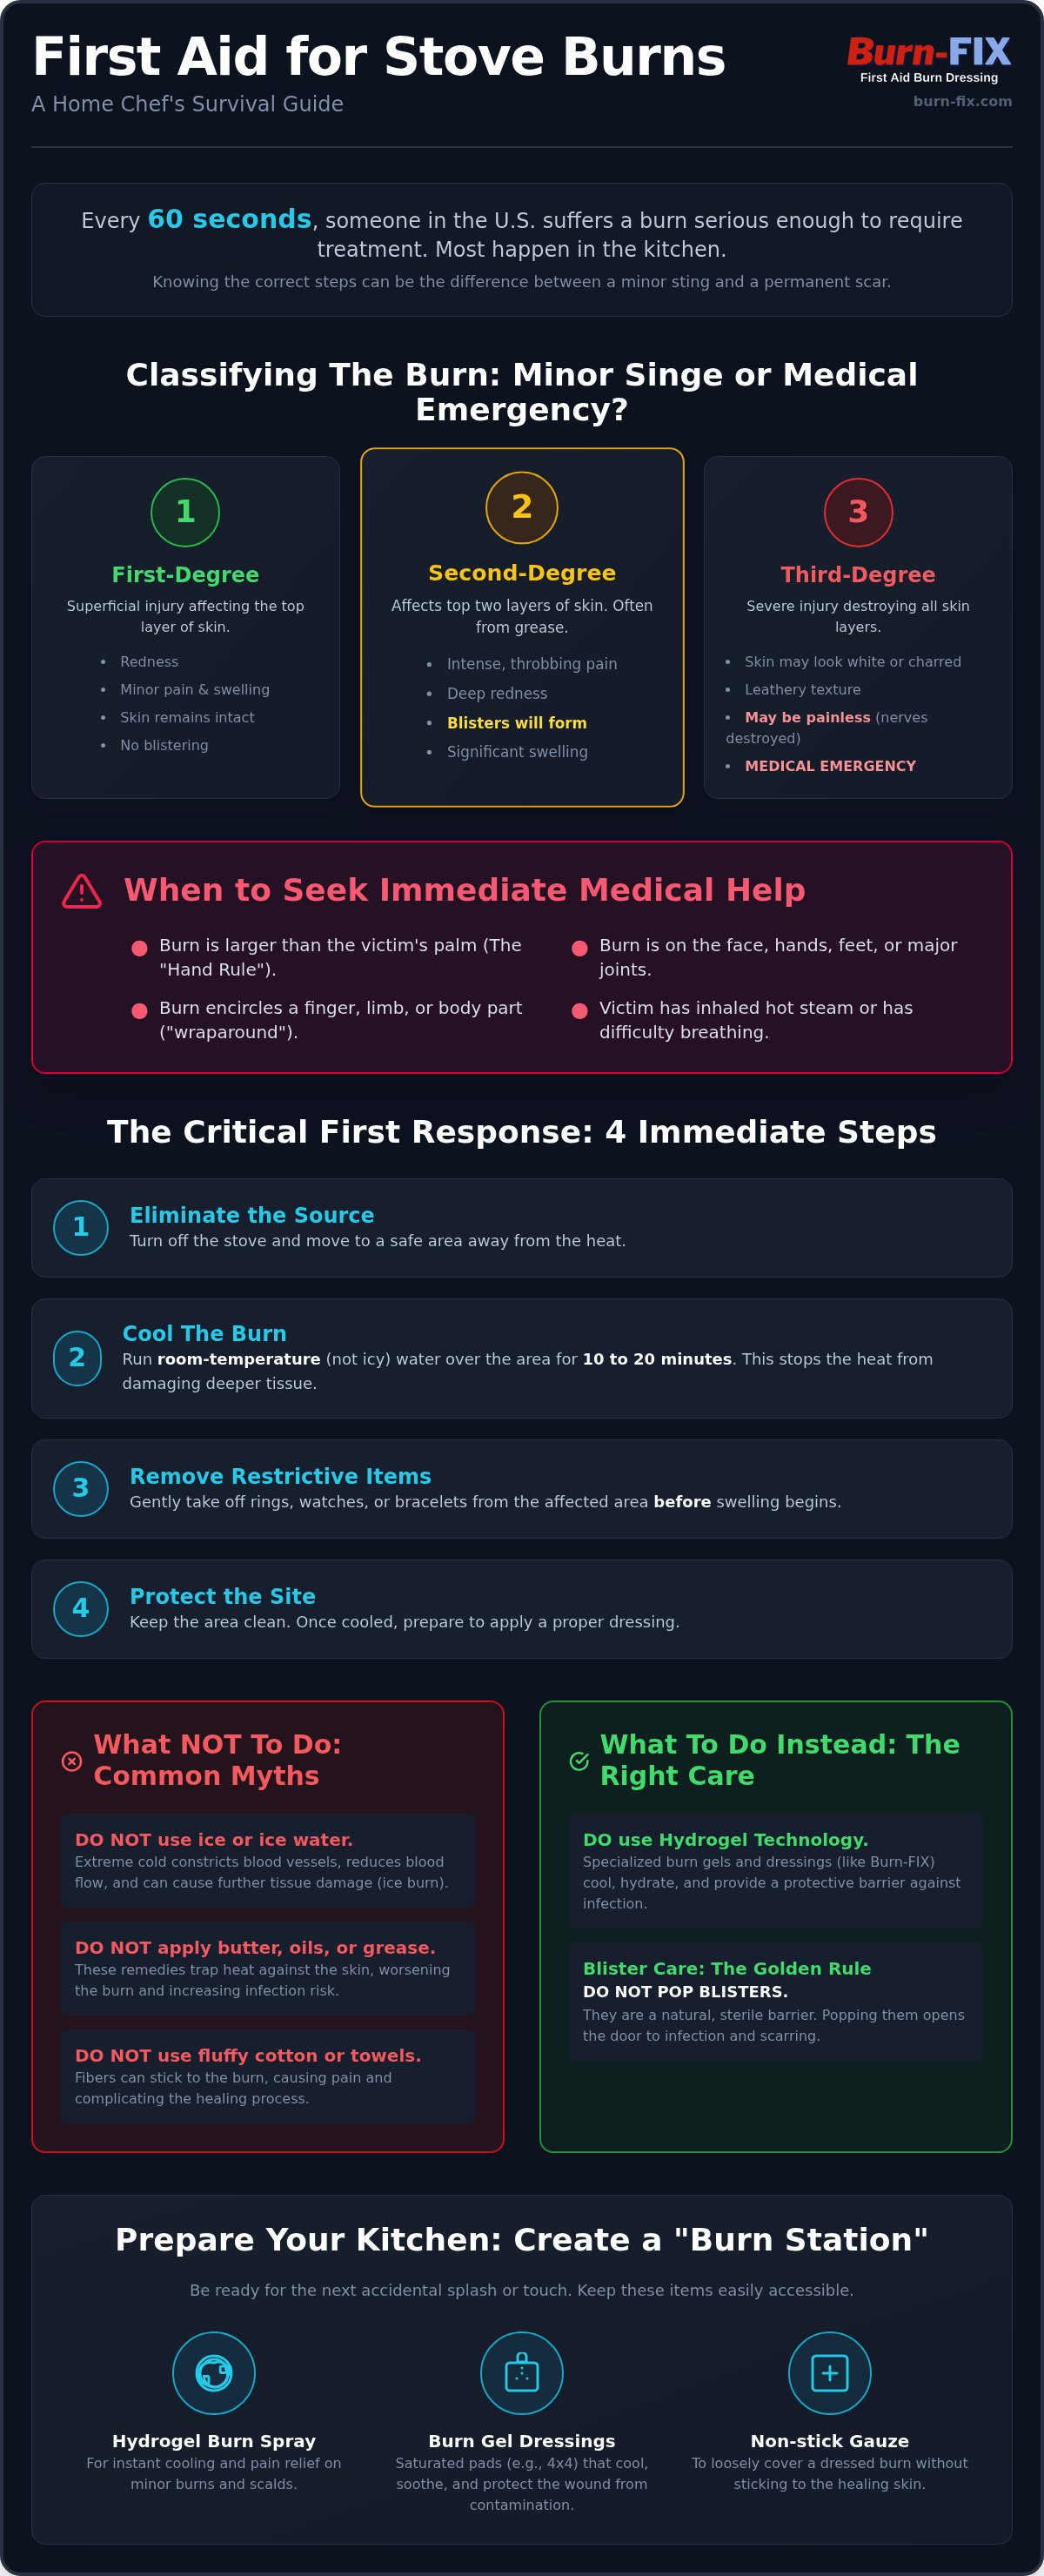
When you touch a hot burner, your brain registers the pain before your hand even moves. Assessing the damage quickly is the first step in effective first aid for stove burns. Understanding the classifications of burns helps you decide if a cool rinse is enough or if you need to head to the hospital. Most kitchen accidents fall into three categories based on how deep the heat penetrated the skin layers.
- First-degree burns: These are superficial injuries. Think of a quick graze against a hot cookie sheet. The area will be red, painful, and slightly swollen, but the skin remains intact without any blistering.
- Second-degree burns: These affect both the top and second layer of skin. A grease splash often causes these, resulting in intense, throbbing pain and the development of fluid-filled blisters.
- Third-degree burns: This is a medical emergency. The skin may look white, leathery, or even charred. Paradoxically, it might not hurt at all because the heat has destroyed the nerve endings.
While some guides suggest a three-inch measurement for seeking help, the "Hand Rule" is often more practical in a busy kitchen. If the burned area is larger than the victim's palm, it requires a professional medical evaluation. Large burns lose moisture rapidly and are highly susceptible to infection, making home treatment alone insufficient.
When to Skip Home Treatment and Call 911
Some injuries bypass the "wait and see" approach. If you've inhaled hot steam and find it difficult to breathe, call emergency services immediately. Facial burns or injuries over major joints like the elbow or knee also require urgent care to prevent long term mobility issues. Be particularly wary of "wraparound" burns. If a burn encircles a finger or a limb, it can restrict blood flow as the area swells. This creates a dangerous "tourniquet" effect that requires professional intervention to save the tissue.
Stove vs. Oven vs. Steam: Understanding the Heat Source
Not all kitchen heat behaves the same way. Dry heat from gas flames or electric coils causes immediate surface damage that is usually easy to see. Steam is far more deceptive. It carries more energy than boiling water and penetrates deeper into the tissue, often causing significant damage before you realize the severity. Grease is another unique threat. Because oil holds heat longer than water and clings to the skin, it frequently leads to severe second-degree injuries. Recognizing these differences is vital when applying first aid for stove burns, as grease and steam often require more aggressive cooling and specialized moisture retention to stop the "cooking" process under the skin.
The Critical First Response: Immediate First Aid for Stove Burns
The moment your skin hits a hot surface, a race against time begins. Effective first aid for stove burns starts with neutralizing the thermal energy before it travels deeper into your tissue. Heat is a persistent enemy. It doesn't dissipate the instant you pull away from the burner; instead, it lingers in the skin layers, continuing to "cook" healthy cells long after the initial contact. Your immediate priority is to stop this progression and stabilize the injury site.
- Step 1: Eliminate the source. Turn off the stove and move to a safe area with a sink.
- Step 2: Cool the burn. Irrigate the area with room-temperature running water for at least 10 to 20 minutes.
- Step 3: Remove restrictive items. Gently take off rings, watches, or bracelets before localized swelling begins.
- Step 4: Protect the site. Keep the area clear of kitchen debris, flour, or cleaning chemicals while you prepare a proper dressing.
The Cooling Protocol: Why Temperature Matters
Precision is vital when managing temperature. While your instinct might be to use ice or freezing water to "shock" the pain away, extreme cold is actually counterproductive. Icy water constricts blood vessels, which reduces the vital blood flow needed for cellular recovery and can lead to secondary tissue damage known as "ice burn." Room-temperature water is the medical standard because it safely draws heat out of the skin without causing further trauma. This is particularly important when applying first aid for finger burns. Because our fingertips have such a high density of nerve endings, the pain can feel disproportionately intense. If you can't stay near a sink, applying a specialized solution like BurnFix Hydrogel Burn Spray offers a portable way to achieve that same consistent, deep-tissue cooling.
Removing Jewelry and Constrictive Clothing
Kitchen burns trigger rapid localized edema, which is the medical term for swelling caused by fluid trapped in your body's tissues. This happens quickly. A ring that fits perfectly now can become a dangerous tourniquet within minutes, cutting off circulation to the finger. You must remove jewelry and tight clothing immediately. If clothing is stuck directly to the burned skin, do not pull it away. Tearing fabric from a wound can rip the fragile top layer of skin, increasing the risk of infection and scarring. In these cases, leave the fabric in place, continue cooling the area with water, and seek professional help. Protecting the integrity of the skin during this initial panic phase is the best way to ensure a smooth, scar-free recovery.
Why Traditional Home Remedies Fail (and What to Use Instead)
In the frantic moments following a kitchen accident, many people reach for whatever is closest in the cupboard. While these "old wives' tales" are passed down through generations, most common kitchen remedies actually hinder the body's natural healing process. When you're performing first aid for stove burns, your goal is to remove heat, not trap it. Using the wrong substance can turn a manageable first-degree singe into a complicated, infection-prone wound.
- The Butter Myth: Fats and oils are insulators. They create a barrier that seals heat inside the skin, forcing the burn to penetrate deeper into the tissue.
- The Ice Trap: Extreme cold causes rapid vasoconstriction. This shuts down blood flow to the injury and can lead to "ice burn" or tissue necrosis.
- Toothpaste and Flour: These substances are often abrasive or contain chemicals that irritate the wound bed, making professional cleaning much more painful later.
Heat needs an exit strategy. Modern medical standards have moved away from heavy ointments and toward water-soluble solutions that prioritize temperature regulation and moisture balance. This transition from "pantry cures" to professional-grade technology is the most effective way to ensure a scar-free recovery.
The Dangers of Trapping Heat
Thermal conductivity is the science of how heat moves through different materials. Ointments like Neosporin or heavy petroleum-based creams have high insulating properties. If you apply these to a fresh, "hot" burn, you're effectively "browning" the tissue from the inside out. You should never apply heavy creams until the skin has been thoroughly cooled and the "burning" sensation has subsided. For a deeper look at why temperature control is so delicate, the hydrogel vs ice for burns debate highlights how extreme cold can be just as damaging as the initial heat source.
Hydrogel: The "Sink in a Bottle" Solution
While the 20-minute water rule is effective, it's often physically difficult to maintain. Keeping a burned hand under a running tap for a third of an hour is uncomfortable and wasteful. This is where hydrogel technology changes the game. A professional burn relief spray acts like a "sink in a bottle," providing consistent, deep-tissue cooling without the need for a constant water source. Because it's a water-based gel, it draws heat out of the skin while simultaneously providing a protective moisture barrier. This prevents the skin from drying out and cracking, which is often what causes that painful "tight" feeling during the first few hours of recovery. It's a safe, gentle option for children who might not have the patience for long cooling sessions at the sink, ensuring they get the same high-standard first aid for stove burns as an adult.
Managing the Recovery: Blister Care and Safe Healing
The sting of a stove burn often lingers long after the heat source is gone. As the initial panic fades, your focus must shift from cooling to shielding. Managing the recovery phase correctly is what prevents long term scarring and painful infections. The most important rule in first aid for stove burns is simple: never intentionally pop a blister. That fluid filled bubble is a natural, sterile barrier produced by your body to protect the delicate new skin forming underneath. Breaking it prematurely invites bacteria into the wound bed and slows down the regenerative process.
When the injury is significant enough to blister, a standard adhesive bandage won't suffice. You need a specialized barrier like the Burn-FIX 4x4 First Aid Burn Gel Dressing. Unlike traditional dry gauze, which can stick to the wound and rip away new tissue during changes, a hydrogel dressing maintains a moist environment that encourages faster healing while providing a final layer of soothing relief. This moisture is vital for preventing the skin from becoming brittle and cracking as it heals.
Applying a Sterile Dressing Correctly
Proper application requires a gentle touch. Always wrap the area loosely; your skin will continue to swell slightly over the next 24 hours, and a tight bandage can restrict blood flow. A hydrogel soaked pad is ideal because it keeps the wound bed moist, preventing the "tight" and itchy sensation that often leads to accidental scratching. This is especially helpful when following the protocol for first aid for steam burns, as steam often creates clusters of small, fragile blisters that are easily damaged by friction.
What to Do if a Blister Breaks
Accidents happen, especially on high friction areas like the palms or fingers. If a blister breaks on its own, don't panic. Gently clean the site with mild soap and room temperature water. Crucially, don't remove the flap of skin, often called the "roof," of the broken blister. This skin still provides a layer of protection for the raw tissue below. Apply a thin layer of antibiotic ointment, only after the initial cooling phase is complete, and cover it with a sterile, non stick pad.
Monitor your recovery closely. While some redness is normal, you should watch for signs of infection such as spreading streaks of red, the presence of pus, or a systemic fever. For managing the throbbing discomfort, over the counter options like ibuprofen can reduce both pain and inflammation. To ensure you have the right tools for a safe recovery, keep a Burn-FIX 4x4 First Aid Burn Gel Dressing in your kitchen so you're never caught unprepared.
Preparing Your Kitchen for Future Accidents: The Home Chef Checklist
Cooking is a high stakes environment where heat and speed often collide. While we've discussed how to react to an injury, mastering first aid for stove burns involves more than just knowing how to treat an injury; it requires a proactive setup that minimizes the time between contact and care. Search time is injury time. By establishing a dedicated "Burn Station" tucked away from your general first aid kit, you ensure that specialized treatments are immediately accessible when every second counts. This separation prevents you from digging through boxes of generic adhesive bandages while your skin is actively searing.
Prevention remains your first line of defense. Always use dry oven mitts; a damp cloth or wet mitt creates an instant steam bridge that can cause deep tissue damage before you can let go of a hot pan. Additionally, turning pot handles inward prevents accidental snags that lead to major grease splashes. Having these supplies ready is the cornerstone of effective first aid for stove burns.
- BurnFix Hydrogel Burn Spray - 120ml: For immediate, widespread cooling of first-degree singes.
- Burn-FIX 4x4 First Aid Burn Gel Dressings: To shield and hydrate blistering second-degree injuries.
- Sterile Gauze: For loosely securing dressings without adding friction.
- BurnFix Burn Gel - 3.5g Per Packets: Ideal for precision application on finger nicks and small splashes.
The Essential Kitchen Burn Kit
A standard medical box isn't enough for a professional or home kitchen. Your kitchen safety first aid kit must prioritize moisture management and rapid cooling over simple wound closure. While a cut needs pressure, a burn needs a "sink in a bottle" to halt the thermal progression. Keep travel-size gel packets nearby for minor finger touches that don't require a full dressing. Finally, set a recurring reminder to check expiration dates on your sterile supplies every six months. Degraded hydrogel loses its cooling efficacy, which can compromise your recovery speed during a crisis.
Creating a Culture of Kitchen Safety
Safety is a shared responsibility, especially in a family home. Teach children to recognize the "no-go zone" around the stove, emphasizing that even a cooling burner can still cause significant harm. It's equally vital to know how to handle a grease fire. Never use water, as it causes a violent explosion of oil that leads to catastrophic burns; instead, smother the flames with a lid or baking soda. Keeping an emergency burn kit for home within arm's reach of your primary cooking area ensures you can act with calm urgency, transforming a potential disaster into a manageable recovery.
Mastering Kitchen Safety for the Modern Home Chef
A split-second distraction shouldn't end your dinner party or leave a lasting mark on your skin. By moving past outdated pantry myths like butter or ice and embracing hydrogel technology, you've taken the most important step in protecting yourself and your family. Mastering first aid for stove burns is about more than just recovery; it's about maintaining a professional standard of safety right in your own kitchen. You now know how to identify the severity of an injury, cool the tissue effectively without causing further trauma, and protect fragile blisters with moisture-retaining dressings.
Preparation is the final ingredient for any successful home chef. Don't wait for the next grease splash or hot pan touch to realize your kit is missing essential supplies. With a doctor-recommended hydrogel formula designed for instant cooling, you can neutralize pain the moment it happens. We offer fast shipping for emergency preparedness so you're always one step ahead of the heat.
Equip your kitchen with a professional Burn-Fix Kit today and cook with the peace of mind that comes from being truly prepared. You've got the skills; now make sure you have the right tools to stay safe.
Frequently Asked Questions
Can I put ice on a stove burn?
No, you should never apply ice directly to a stove burn. Extreme cold constricts your blood vessels and can cause secondary tissue damage known as an ice burn. This restricts the blood flow necessary for your skin to heal properly. Instead, use room-temperature running water or a specialized cooling agent like BurnFix Hydrogel Burn Spray to safely draw out the heat without shocking the delicate tissue.
How long should I keep a stove burn under water?
You should keep the injured area under room-temperature running water for at least 10 to 20 minutes. This duration is critical because skin continues to damage healthy cells even after you've pulled away from the heat source. If you can't stay at the sink, applying a Burn-FIX 4x4 First Aid Burn Gel Dressing provides that same deep-tissue cooling and moisture retention required to stop the thermal progression.
Should I cover a minor stove burn or let it breathe?
You should cover a minor burn rather than letting it "breathe." Exposing a fresh injury to the air can cause the wound bed to dry out, leading to painful cracking and an increased risk of contamination. A loose, sterile dressing protects the site from friction. Using a non-stick pad, such as the Burn-FIX 4x4 First Aid Burn Gel Dressing, ensures the skin stays hydrated while preventing the bandage from sticking to new tissue.
What is the best cream for a stove burn with blisters?
Avoid heavy, oil-based creams on a fresh burn with blisters, as they trap heat and can lead to infection. The best approach for first aid for stove burns involving blisters is a water-based hydrogel. Products like BurnFix Burn Gel provide a protective moisture barrier that mimics the skin's natural environment. This helps manage the throbbing pain while keeping the blister intact, which serves as your body's natural sterile bandage.
How do I know if my kitchen burn is infected?
Watch for specific red flags that indicate an infection is developing. If you notice redness spreading in streaks away from the injury, the presence of foul-smelling pus, or if you develop a systemic fever, seek medical attention. Increased swelling or pain that worsens after the first 48 hours is also a sign that the wound needs professional evaluation. Keeping the area clean and using sterile dressings helps prevent these complications.
Is it okay to put butter or mayo on a burn?
No, you should never use butter, mayo, or other kitchen fats on a burn. These substances act as insulators that seal the heat into your skin, effectively continuing the "cooking" process. They are also non-sterile and can introduce bacteria into the wound bed. Professional first aid for stove burns relies on water-soluble hydrogels that neutralize heat and can be easily rinsed off by a doctor if further treatment is needed.
When should I see a doctor for a burn from the oven?
Seek professional medical help if the burn is larger than the size of your palm or if it covers a major joint, the face, or the hands. You should also see a doctor if the skin appears white, leathery, or charred, as these are signs of a deep injury that requires specialized care. If a burn encircles a finger or limb, it's a medical priority because the resulting swelling can dangerously restrict circulation.
How do I stop a stove burn from stinging?
Immediate cooling is the most effective way to stop the stinging sensation. Drawing the thermal energy out of the skin layers neutralizes the pain receptors. While water is a good start, BurnFix Hydrogel Burn Spray - 120ml provides faster, more localized relief by using a specialized formula that stays on the skin. It offers a soothing, protective layer that provides comfort during the initial high-pain phase of a kitchen accident.


